Saturday, February 1, 2025

How to Pick Many Colors from An Image

How to Pick Many Colors from An Image-Selftaught-CorelDraw

Today, I found this picture. I like the color combination from it and I want add some blue color from the picture. Usually I would use COLOR EYEDROPPER TOOL to pick one color and then color the object one by one.

COLOR EYEDROPPER TOOL-SELFTAUGHT-CORELDRAW

But today I'm going to add the color sand make a pallete so I can use them in the future. Ok, let's begin the work....

First, I would import the image by pressing CTRL + I, and find where I saved the picture above on my computer. When the image has been imported into the document, select the picture using PICK TOOL and the go to the WINDOW toolbar then select COLOR PALLETES and pick CREATE PALLETE FROM SELECTION.

Then there will be a prompt to save the color pallete. I named it SUNSET BLUE. It will be saved in xml file type. After you named the pallete, you can pick any the amount of color which you want to  extract from the image and make put them into the pallete, so you can use them at anytime in the future.

Look at the numbers of color we can pick from the image. Add how many you like the color you want to add. This time I would 98 types of color. :P

ADD COLOR FROM BITMAP-SELFTAUGHT-CORELDRAW

Or if you want just to add the color to the document pallete, just select the image. Go to WINDOW toolbar, point the mouse to COLOR PALLETES menu and choose the ADD COLORS FROM SELECTION sub menu. Make sure the DOCUMENT PALLETE is checklisted so you can use them from the DOCUMENT PALLETE.

You can also save this pallete into a single file by clicking the small triangle. Point your mouse to PALLETE menu and choose SAVE AS in the sub menu. By the time you have your own color selection, it will be easier for you to choose any color you desired.

That's all for this topics, explore more and Happy Corelling :)


Wednesday, January 1, 2025

Making a Simple Logo

Hello, here I would like to make a logo for ken-digimark in Corel X5.

Open your CorelDRAW X5 and then click FILE > NEW to make a new document. Just open in any measurement you want, usually I choose A4 paper then click OK.

Start by making a circle with diameter 10 cm and next go to BLEND tools menu, usually it's on the left of your screen. Then you can click and hold for a while and it will expand then choose CONTOUR.In the option box you can choose what kind of CONTOUR you would like to use.

There are 3 options for CONTOURING.

1. To Center; it means the line will be duplicated to the center of your object
2. Inside Contour; the line will be duplicated to inside direction of your object
3. Outside Contour; the line will be duplicated to ouside direction of your object

This time I will use 2 cm the distance ousude the object twice.

After that draw a polyline, you can make it to any direction you like and then give 0.6 OUTSIDE CONTOUR. Also you should draw an arrow for the end of the line. Put the end of the polyline with the beginning of the arrow. When you've done giving the polyline with 0.6 OUTSIDE CONTOUR then remember to BREAK CONTOUR GROUP APART or CTRL + K.

Combine the arrow and the object from polyline using WELD command. Delete all the node on the line which connect from the joined polyline and arrow, so it will have only the beginning nodes and the end nodes.

Pick the circle you've been countoured, CTRL + K to break them and UNGROUP the objects. Select the biggest circle with the medium circle and COMBINE or CTRL+K to combine them.

I colored the smallest circle with color C=40 M=0 Y=40 K=0 and the combined circle with C=0 M=40 Y=80 K=0.

Since I want to make a line that getting bigger near the arrow, so I'll move the nodes on the left more to the left and so the right nodes more to the right. Do the same ting with the beginning of the line, but make it narrower by moving the nodes inside. Adjust the position the arrow so it will look like on the center. Next give 0.5 OUTSIDE CONTOUR to the arrow to give a space to the circle. Break it apart and duplicate once.

Now it's time to make a gap between the arrow and the smallest circle. Select the circle and the aparted contour arrow and use the BACK MINUS FRONT from the SHAPING docker. Do the same thing with the light orange circle.

ken-digimark.biz.id logo

Draw 2 rectangles for the handle, give space to each other. Join the small rectangles with the light orange circle. And color the big rectangles with C=100 M=100 Y=100 K=100 to give real black color.

Group the objects into 1 and rotate 25 counter-clockwise because it's already 2025..... LoL and it will look like this. Hope it will give you guys more idea in doing Corel Draw.

Well, please note that this article is only for beginners so it might so easy for the experts.


Coming Back After 10 years Inactive...

It's good to see you again, starting the New Year 2025.....


It's been a long 10 years since I last wrote a blog post. The world has changed dramatically in that time, and so Comighave I. As I sit down to write this article, I feel a mix of excitement and confusion what should I write.

Blogging was once an exciting part of my life, a creative outlet where I shared ideas, opinions, and experiences. Now, returning after a decade of silence feels like reconnecting with an old friend.

Coming Back Blogging


Life has a way of pulling us in unexpected directions. Over the past decade, my priorities shifted—career demands, personal growth, and family commitments took center stage. Writing, unfortunately, fell by the wayside. But as the years passed, I began to feel a longing to return to the craft, to express myself through words once more.

The Blogging Landscape Today

The blogging world has transformed in my absence. Platforms have evolved, social media has become a dominant force, and content creation is more competitive than ever. While this can seem overwhelming, it’s also inspiring. The diversity and creativity in the blogging community today offer a wealth of inspiration to draw from.


As I embark on this new chapter, I’ve decided to approach blogging with a fresh perspective. Here’s what you can expect:

From personal experiences to professional advice, my blog will have more subject about using Corel Draw. While I may not post daily, I’ll strive to maintain a regular schedule to keep the momentum going.

First time using Corel again


Returning to blogging feels like coming home after a long journey. It’s a chance to reconnect with my passion for writing and engage with a community of like-minded individuals. To anyone considering a similar return to a long-lost hobby or passion: it’s never too late to start again. Embrace the process, and let your creativity flow.

Here’s to new beginnings and rediscovering the joy of blogging!

Monday, January 20, 2014

Interactive Transparency Tool - The Introduction

Nowadays, there is trend to make a logo with has its shadow as if the object is on the mirror. Now, I'm gonna try to make object which has shadows as if it's on a mirror. To make the shadow,We'll need in Interactive Transparency Tools is commoly used to make transparent drawing, shadow effects, mirror effects and also some glossy effects.

Ok, ler's get started...

1. First,We'll need a new document. You can access Menu FileNew or You can use the shorcut key by pressing CTRL+N to start a new drawing. Just remember that the text inside the bracket is the shortcut key for the command.
2. Make a shape, any shape You like.This time I will make a rectangular shape using Rectangle Tool (F6). To make proportional shape, hold down CTRL while dragging. Give color to the rectangle.To colored the shape, just left click the color on Color Palletes Docker, it's in the right side of your screen for default.

I'll give the color Red, and the outline is 2mm thickness, so when We apply the transparency It will have visible look. You can change these in Property Bar.

Saturday, January 18, 2014

Terminology and Concept in CorelDRAW®

Illustration images taken from Answers.com
When We use something, We must know the common words related to. This time I will explain a little about common words use in CorelDRAW® . Actually this post shoukd be the first post, but because I just remembered that not everyone knows about common words use in CorelDRAW®.


  • Object, is an element in a drawing, such as an image, shape, line, text, curve, symbol or layer
  • Drawing, is the work You created in CorelDRAW®. For example: custom artworks, logos, posters and newsletters.
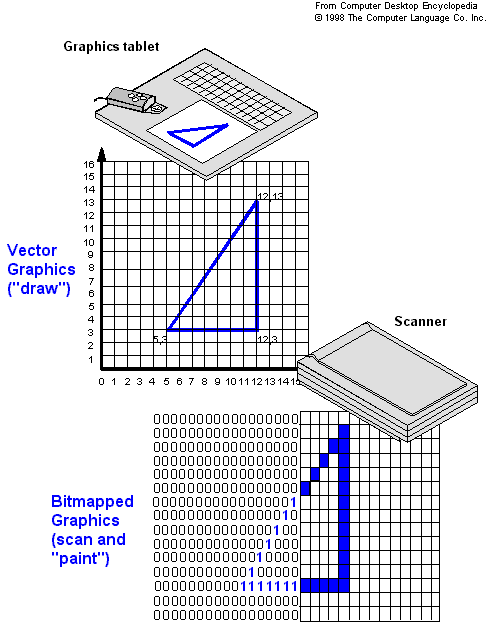
  • Vector graphic, is an image generated mathematical descriptions that determine the position, length and direction in which lines are drawn.
  • Bitmap, is an image composed of grids of pixels or dot.

  • Docker, is a window containing commands and settings relevant to a specific tool or task
  • Flyout, is a button that opens a group of related tools.
  • Artistic Text, is a type of text to which You can applied special effects, such as shadows.
  • Paragraph Text, is a type of text to which You can applied formatting options, and which can be edited in large blocks.
From the explanation above at least We have more knowledge when exploring CorelDRAW®. 
Happy Coreling...

    Thursday, January 16, 2014

    How To Make Simple Gear

    Hello... We meet again, after posting about Text, now I want to learn about how to make simple gear. This is also the basic one I've learned. Let's get started...


    To create a gear We'll need three objects, first, draw two circles and a rectangle. The first circle should be bigger than the second circle. Use Ctrl key to aim the proportional round for the the circle. It will have same width and height.After that create the rectangle, not to big, the important is the height is longer than the diameter of the big circle.
    When You're done, You will have three objects like these.

    Move the three object based on thier center. Drag the mouse in center of each object than the cursor will autonatically snap to object's center point. Or You can select all object then press C+E, these will align objects according their center of vertical and horizontal. Sometimes this kind of shortcut key is very useful to safe time working.

    Now We'll need the gear tooth. Select the rectangle.
    Go to the Menu Bar - Arrange - Transformation - Rotate, or press Alt+F8, to show the Transformation Docker.


    Saturday, January 11, 2014

    How To Fit Objects To A Path

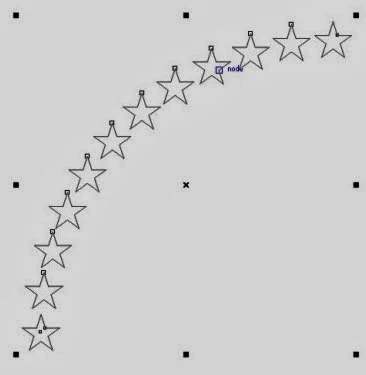
    Continuing from the last post in How To  Combine Text Into A Path, now I'm going to learn another same thing, but different materials

    As you can see, the stars beside are placed in a pattern. CorelDRAW has the tool that can be used not just text that follow a path, but objects can follow a path or shape too.

    Ok, let's begin....


    Thursday, January 9, 2014

    The Difference Between Group and Combine

    Group

    Earlier I used CorelDRAW, I found two term, Group and Combine. At first I can't find the difference, because the view is almost the same, then finally I realized that those two things are different when we take a real closer look.

    Group is "binding" two or more object become a cluster, but each object still maintaining their attributes such as Fill, Outline, etc. When we click once, automatically the other object included in the group will also be selected. With the grouping objects we can apply the same formatting, properties, and other changes to all the objects within the group at the same time. We can also make group other groups to create nested groups.

    Wednesday, January 8, 2014

    Editing The Fit Text To Path

    From the previous post I wrote about how to fit text to a circle or a path. Now I'm going to learn how to edit the properties so the text can be customized. When you've done create text and a circle, then clicking the "Fit Text To Path", what's next? Here's the explanation....


    I will explain it one by one, don't get bored...Ok??

    How to Combine Text Into A Circle or Path

    Text into a path
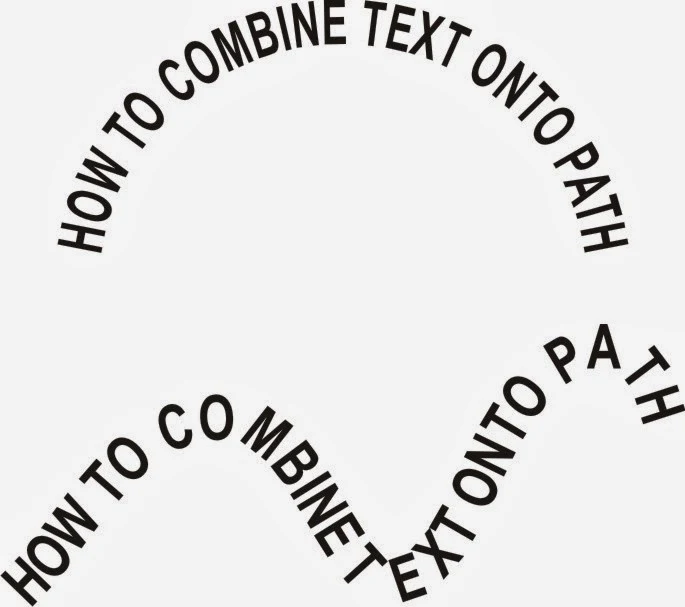
    Have you ever saw some text that looks like the pictures? Or maybe we often see a logo that has text which follow its shape. Using CorelDRAW it's pretty easy to make it

    Sometimes we need to apply text to follow the path we made, or may be we want to make a circular round text or even half circle text. Well, this time i would like to learn how to make the text like that.

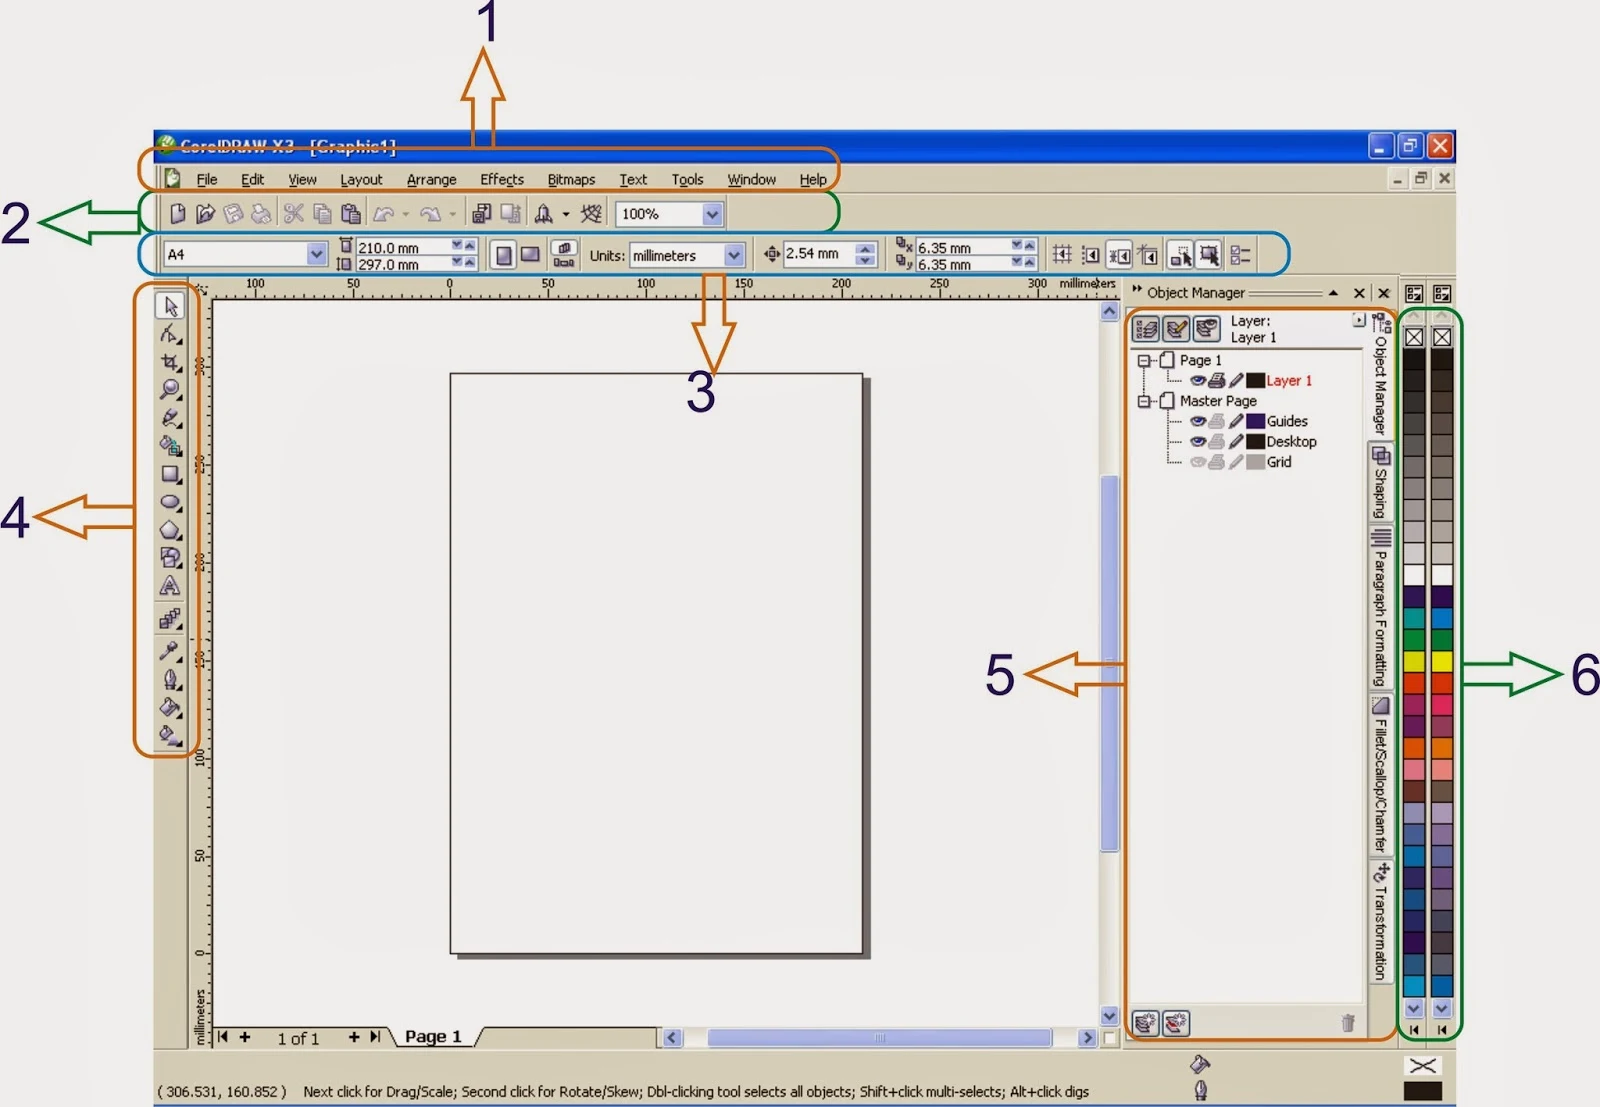
    What is on your CorelDRAW X3 screen?


    Hello.... we meet again.
    I have a lot of questions where should they start from. Actually, as a selftaught in using CorelDRAW i have no guidance where should i start from, but during the usage of CorelDRAW, i conclude that many people are confused about the first screen such as picture above. Here i try to explain basic thing, so if you maybe read another books about CorelDRAW, you know where to look from. In this explaination I used CorelDRAW X3, but there is not many so different look from the latest version CorelDRAW X6.

    Ok, let's get started...

    CorelDRAW History

    In 1985, Dr. Michael Cowpland established Corel to sell Intel based desktop-publishing system. At first, Corel was established to intend as a research laboratory or we may say Corel was an abbreviation of Cowpland Research Laboratory.

    In 1987, Corel recruited some software developer (programmer) to build a vector-based graphic software to be bundle in Corel Desktop-Publishing Package. Then the software was named CorelDraw launched in 1989.

    CorelDraw was made for Windows Operating System coincided with the launching of Windows 3.1. Because of the TrueType was included in Windows 3.1, made Corel as an illustration software which has ability to use the avalaible fonts which no need an addtional software such as Adobe Type Writer

    Corel 2.0 (1991)
    Corel 3.0 (1992)

    Friday, October 12, 2012

    CorelDRAW X6

    A few days ago I read an article about this Corel Draw Version X6. Actually I use version X3 because I am already comfort and friendly using the old version.And off course there a lot of differences. The menu, the display etc. But the most i like from this CorelDRAW® Graphics Suite X6 is the default measurement is in millimetre. A little bit help.


    The new features:

    1. New creative vector shaping tools. CorelDRAW X6 introduces four shaping tools that provide new creative options for refining your vector objects. The new Smear tool lets you shape an object by pulling extensions or making indents along its outline. The new Twirl tool lets you apply twirl effects to objects. And you can use the new Attract and Repel tools to shape curves by attracting or separating nodes.
    2. Page layout tools. Reserve a place for text or graphics using new empty PowerClip frames. Use the new Placeholder Text command to mock up a page layout and get a good sense of how the text will look. Plus, easily add page numbers with the Insert Page Number command.
    3. WhatTheFont?! tool. In CorelDRAW X6 can identify font from the scanned document so it can be reproduceable and directly connected to myfonts.com
    Well, are you interested using CorelDraw X6? You can download from here.


    Thursday, August 16, 2012

    Hello World ....

    First time making web blog or as we now as blog. Thanks to my friend who lead me to this kind of experience and also i want to apologize to everyone that saw this blog different from the first time.

    Maybe it is too late to become publisher like this, but it's better than never :P.

    I'm trying to bulid this blog among my busyness of my work. Hope that this blog will exist. Off course the content of this blog refer to what i do everyday. What do I do? I am a newbie graphic designer, trying to publish some of my work around the globe.

    Well,  I have nothing to say anymore, just enjoy this blog, hope the contents will be usefull for everybody.